Developing the “Zombie Truck”
The Zombie Truck Concept
I am certainly not the first to come up with the idea of vehicle to survive the apocalypse, whether it be from zombies or some human inflicted armageddon. The internet is filled with photos and renderings of something commonly known as PAV’s (post apocalyptic vehicles), which are essentially real vehicles or vehicle concepts created to survive a theoretical armageddon. Usually these vehicles are based on Jeeps or pickup trucks and feature a rough and rustic look, simply because no one needs to keep a vehicle clean after the world has ended! Some of these vehicles have vinyl stickers that say “Zombie Exterminators” or “Zombie Control Unit” or something similar, but not one vehicle has ever been purpose built from the ground up for zombie hunting and disposal, which is how the idea of the Zombie Truck was born!

The Zombie Truck Concept – Version 1 Concept : Hummer H3
The first version of the Zombie Truck concept was to build a vehicle strictly for zombie hunting and extermination, a SWAT style vehicle based on a mid sized SUV or pickup truck that we could outfit on the inside and out with zombie hunting gear. The first version of the concept used the Hummer H3 as a platform and we based our renderings and design plans on that vehicle. You can see a rendering of the Hummer H3 based Zombie Truck below:

The original Zombie Truck concept was created within the confines of a computer, however many of the important features that were in the first concept ended up in the final real Zombie Truck.
| Zombie Truck Original Concept – Core Features | |
|
|
After reviewing the original concept rendering using the Hummer H3 platform, I felt it was missing something. The concept was certainly cool looking, but other than the zombie on the top of the vehicle roof rack, and metal cabinet on the rear door, it just looked like a stickered up Hummer H3 with some upgraded wheels. Granted, the interior would have been well modified, however people who saw it while the truck was driving on the road, or who strolled by it while it was on display likely wouldn’t get the opportunity to experience the interior work as they would only see it briefly from the outside. In addition, the Hummer H3 itself doesn’t really command attention as it isn’t a particularly rare or unique vehicle. The truck needed to be more edgy and more rough, something less refined. I came up with the idea of building a full size 6′ tall cage that could carry zombies, but a full cage wasn’t going to fit in an SUV, I needed a pickup truck. The problem again with most pickup trucks is that they are really bland looking, and not attention getters no matter what gets done to them (although I’m sure a few zombies in a cage in the truck bed would help). The solution? A JAPANESE MINI TRUCK!
The Zombie Truck Concept – Version 2 Concept : The Japanese Mini Truck / Kei Truck
If you have never heard of a Japanese Mini Truck or “Kei” truck, don’t worry, you are not alone. These vehicles are quite rare as they were never sold as new in the North American market. They are however quite popular in Japan and parts of Europe due to their bare bones design, small size and excellent fuel economy. Most delivery trucks and work trucks in Japan are mini trucks, or “kei trucks” as they are known abroad. There are a handful of common kei trucks in production made by Honda, Suzuki, Subaru, Mitsubishi and Daihatsu, what’s really interesting is that they are virtually all the same look and dimensions and many share similar parts despite being produced by different Japanese manufacturers.
Japanese Mini Trucks have become popular for import to North America because they are very practical for use on farms, in factory’s and around small hotels and resorts. The mini trucks have also found a loyal following amongst off roader’s and ATV owners as these trucks are small, lightweight and usually equipped with 4 wheel drive making them ripe for conversion into the ultimate utility vehicle. A small body lift, some off road tires and a winch makes these little guys perfect for cruising around the trails and even carrying ATV’s and snowmobiles.
What sets these Japanese mini trucks apart from the regular North American small truck offerings such as Ford Ranger or Chevrolet S10/Colorado is that they are even smaller and more compact, to the point that they are “funny looking”. If you put one of these little kei trucks next to even the smallest North American pickup truck, it looks like a toy in comparison, which makes them extreme attention getters. In fact many companies purchase these mini trucks to cover with signage and promotional material in order to attract attention to their company or advertising message, a feature that made the Japanese mini truck a perfect platform for the Zombie Truck!
Being located in Canada, these trucks are even harder to come by as our government only allows Japanese vehicles into the country that are at least 15 years old. Meaning the “newest” truck I could get would be a 1997 unit, which are nearly impossible to find in Canada. I scoured the classifieds and Autotrader until I finally settled on a white 1991 Suzuki Carry mini truck, which I had shipped down to me from a seller in Colbourne, Ontario.

Needless to say, this vehicle isn’t going to win any races, but that’s not what matters in a post apocalyptic zombie infested world. What matters is endurance, fuel economy, and easy maintenance and repairs, and the Suzuki Carry Mini Truck excels in all of those categories. Zombies can only limp by at a few miles per hour, maybe as fast as five miles per hour if they are in close range of food (read: humans), so a vehicle that can only reach 100kmph is plenty fast for outrunning, or decapitating, zombies. Furthermore, post zombie outbreak resources will be scarce, and that includes gasoline. You might think driving around in a Hummer H1 or Brinks truck is the safest and most effective way to get around, but with empty gas stations scattered up and down the interstate, a lightweight, fuel efficient vehicle is your best friend. The Suzuki Carry and similar mini trucks can get gas mileage between 45 and 50mpg! Finally, the Suzuki Carry uses the same engine found in most Suzuki swifts, which are either still running or have lots of available junk yard parts, making servicing and repairing the drive train of the vehicle a cinch. The 4-speed manual transmission, bare bones design, and lack of fuel injection system means there is no complicated electronics to break or fail when you are outrunning a horde of the undead.
The original “zombie extermination vehicle” concept was also changed slightly to fit the look and purpose of the Japanese kei truck. The compact and utilitarian nature of the Japanese mini truck lends itself more towards a “zombie disposal vehicle” (think small garbage truck) rather than a lean and mean zombie hunting machine. Of course there will be times when the truck may be in sticky…errr…bloody situations and therefore needs to be equipped for that, but the overall end purpose will be a vehicle designed for zombie collection and disposal rather than zombie hunting.
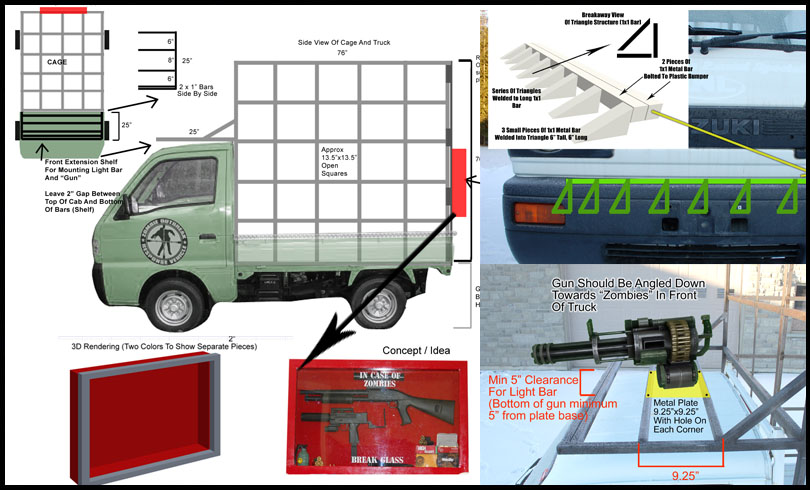
Although I didn’t spend as much time on the rendering of the concept based on the Japanese mini truck, the photo below shows some of the main exterior components that needed to be fabricated for the truck, including the biggest and most predominant feature, the zombie containment cage.

The Zombie Truck Fabrication & Build Process : The Zombie Cage
The most important and most predominant feature of the Zombie Truck is the zombie enclosure cage. As the final purpose of the vehicle is to be a zombie collection and disposal truck, there needed to be a way to safety transport and move “live” zombies around without putting the public at risk. The best solution was to build a large metal cage that could be mounted to the bed of the truck and feature a locking rear gate for easy zombie loading and containment.
In addition, a “shelf” connected to the cage would be used to support auxiliary hardware over the cab of the truck, so we can avoid having to attach items directly to the sheet metal on the cab. This supporting shelf would be used to mount the gatling gun, emergency light bar as well as siren and other auxiliary lights.
The Zombie Cage was fabricated by a company in Ontario that specializes in custom metal work. The cage frame is made out of 1″x1″ steel bars, and the cross members are made out of 1″x1/8″ thick steel flat bar, in order to keep the cost and the weight down. The cage is mounted to the truck bed using six steel nuts and bolts through tabs that are mounted on the bottom of the cage. The rear door of the cage is hinged to allow access to the interior of the cage. The door is finished off with two tabs to pass padlocks through as well as a grab handle to make opening and closing the cage easier. Once completed the cage will be painted flat black and the “zombie emergency kit” will be mounted to the rear door.

The Zombie Truck Fabrication & Build Process : The “Zombie Hunting Green” Paint Job
I felt that white was an unsuitable color for a zombie disposal vehicle, it would look to much like a delivery truck. So in keeping with the zombie hunting and disposal theme, it was decided that a lighter toned army green would be the most ideal color for the vehicle. This also reinforces the idea that the vehicle is some sort of government or military issued vehicle. The truck was stripped bare, rust was sandblasted, then the entire vehicle was primed and painted.

The Zombie Truck Fabrication & Build Process : Interior Painting, Floor Liner And Camo Upholstery
The day after the truck came back from the paint shop I immediately got to work on the interior. Luckily these vehicles come with a pretty plain interior, there was no carpet or excessive amounts of trim to remove, just the seats, door panels and center console. In keeping with the army theme I felt that a rugged looking interior treatment would be best, so the entire floor was sanded down and coated in roll on textured bed liner, the same stuff that you would spray into the back of a pickup truck. The ceiling of the cab had some foam backed vinyl glued to it. This was ripped off, then I grinded down the ceiling to get rid of as much as the foam and glue as possible, finally spraying it in the same textured bed liner used on the floor.
The rest of the interior was sprayed in a semi-gloss black Tremclad enamel. Some of the plastic pieces such as the center console and steering wheel column were painted with green paint that is made for plastic, as experience has shown that it holds up very well. I would have liked to have painted these pieces the same as the exterior of the truck, however I didn’t think of bringing them to the paint shop at the time the truck was being painted.
In addition to changing the color of the interior and some of the plastic pieces, I felt that no Zombie Truck would be complete without a military camouflage interior treatment. The original gray vinyl door panels, seats and headrests were dropped off at a local interior trim shop to get completely redone in a green camo material, which I feel really adds the extra level of detail to the interior work.


The Zombie Truck Fabrication & Build Process : Truck Bed Panel And Misc. Gorey Detail
The very last thing to go into the truck will be full size zombies created by Paul Hopkins and the team over at Haunted House Creations, however before they go in there needs to be something to mount them to. I did not want to drill holes or put bolts through the metal truck bed so I came up with a solution to get a piece of 3/4″ maple plywood and seal one side of it with wood sealer, then coat the top side with the same roll on bed liner used in the interior of the cab. This will allow the metal stands that support the zombies to be mounted with 3/4″ screws.
At the same time I started thinking about how to “gore up” the vehicle a bit, while not making it too extreme that it would offend people with small children who might see it driving around. The first thing I did was to mix some Perma-Blood (blood paint) with some thin string and silicone then attach it to the backs of the side mirrors to give the effect that a zombie impact left some nastiness behind. I also added some blood to the steering wheel, and interior rear view mirror to give the effect that the driver might have got into a situation that called for a zombie bloodbath.

The Zombie Truck Fabrication & Build Process : Dash Mounted Shotgun Holder And Zombie Tracking Screen
To pull of the zombie hunting and disposal theme I knew that firearms would be required, however this is quite a controversial part of the vehicle. As I am located in Canada, we don’t have the same loose gun laws as our neighbors to the south. Even plastic BB guns / air guns like this are not really allowed here unless they are completely see through or some bright neon color to make sure people know they are fake .Obviously a neon colored shotgun or rifle wasn’t going to work, so I had a few plastic air guns shipped up from the USA. I disabled them from ever working, by filling the barrel with epoxy and black caulking, I also left the orange tips on all the guns to make sure people know they aren’t real. The flat area of the dash on the passenger side was a perfect size for mounting a short shotgun, so I built a mounting platform out of wood, coated it in bed liner to match the interior floor, then permanently glued the shotgun to it so it can’t be easily removed. I also strategically placed some perma-blood on the gun to make it look like it has seen some zombie killin’ action.
One of the features I knew any zombie hunting and disposal vehicle would need is a way to locate the closest zombie outbreak. A regular GPS unit simply would not do. I needed something a little more…zombie. I installed a 10.2″ video screen on the dash that plays video in a loop from a USB or SD card. I then created a series of videos (a moving map recorded from Google Maps, and a dispatch terminal with scrolling SMS messages) then combined the videos into a single video file to create something that looks like a real “Zombie Tracking Console”. The map moves around, shows random warning messages and the black area with text is constantly scrolling as if receiving and sending messages from and to a central dispatch center. I also plan to add a handset from a CB radio to the interior to further enforce the idea of two way communication between the truck and a central dispatch center.

The Zombie Truck Fabrication & Build Process : Miscellaneous Interior Details
A few other elements were added to the interior to reinforce the zombie hunting and disposal theme. The first was a small white first aid kit mounted below the dash, labeled “Zombie Outbreak Emergency Kit”. Another item was a “Zombie Bite Emergency Kit” which I fabricated using a small plastic enclosure, vintage glass medical syringes and a two part mixture known as Encapso K. When the two part Encapso K is mixed with color additives it solidify’s to a gel like substance that looks like liquid (think Jello but harder and not edible). I filled the syringes and a small plastic container with the mixture and called it the “EXPERIMENTAL ZOMBIE ANTI-VIRUS PROTOCOL”, the theory being that if injected into a freshly bit victim within 10 minutes of exposure, it can reverse the effects of the zombie virus.
To properly light the various details of the interior in a low light environment a 2W wide angle green LED fixture made by Darklight was installed on the rear view mirror pointing downwards to light the interior with an erie green glow.

The Zombie Truck Fabrication & Build Process : Installing Exterior Auxiliary Lights And Internal Switch Box
No disposal vehicle, whether it be a garbage truck or zombie disposal truck is complete without a serious set of auxiliary lights. When the cage was designed I had it built with a “shelf” over the cab in order to accommodate the installation of accessories such as lighting, a siren, a giant gatling gun and some miscellaneous items like an air tank and gas can. A 10 head LED emergency light bar with white and amber lights was installed in the middle, with two 4″ diameter white LED search lights installed on each side. A black 100W siren speaker was mounted on one side of shelf and will be connected to a solid state MP3 player/amplifier inside the cab that will play two custom audio effects.
On the inside of the truck a custom made switch box was installed in the center console that allows the control of the exterior lighting and sound effects. The four toggle switches control the power to the light bar, search lights, cage lighting and connection to the main battery. The main battery cut off switch allows the auxiliary battery that powers the accessories to be easily disconnected so it doesn’t drain the main battery if left on when the truck is sitting on display for a long time with the auxiliary lights on. The two black switches on the control box are momentary push button switches that trigger the exterior audio effects through the 100W siren speaker. The first button triggers an audio track with an air raid siren followed by dialog saying “Citizens, please remain calm, this area is under zombie quarantine” or something to that effect. The second button triggers zombie moans and zombies saying “Brains… I want your brains…. brainssssssss…”

The Zombie Truck Fabrication & Build Process : The Zombie Emergency Kit
One of the coolest features of the Zombie Truck is the red metal enclosure that will be mounted to the rear of the cage that contains zombie extermination weaponry and emergency supplies. This is not an original idea as many hobbyists and do-it-yourselfers around the web have built their own “in case of zombies break glass” style enclosure containing various items, but I believe this is the first time one has been mounted to a moving vehicle!
The enclosure case was custom made by a friend at a local metal fabrication shop, and the interior panel containing the mounted guns and props was fabricated by myself, then attached to the rear of the cage using standard mounting hardware. This is a somewhat controversial feature of the Zombie Truck project, as it openly and publicly displays weaponry, however all items in the enclosure are non-lethal, plastic fakes. My only hope is no one thinks that they are real and try’s to steal them. Like the interior shot gun I left the orange tips on the guns to make sure people know they are fake, the guns have also been disabled from firing plastic pellets in the future if they were ever removed. Essentially they are now just static props.

The Zombie Truck Fabrication & Build Process : The BFG – Custom Gatling Gun
No post zombie apocalyptic vehicle would be complete without a BFG (thanks Duke!). This gun was conceptualized by us in the original design on a smaller scale, but the guys at Haunted House Creations wanted to build something that would wow the crowds. This custom gatling gun features intricate CNC’ed details, replica bullets and a sturdy PVC and sonotube construction. The whole unit is mounted to a modified camera tripod that is bolted to the upper shelf above the truck cab. If you ever need any custom work done like this, the creative team over at Haunted House Creations are the guys you want to call.

The Zombie Truck Fabrication & Build Process : Vinyl Graphics Installation
We didn’t feel that a “gangrene colored” mini truck with a bunch of zombies in the back was obvious enough, so we had the team over at Scutt Signs in Guelph, Ontario put together a killer vinyl graphics package consisting of large door logos, “Zombie Bite Hazard” signs, and some long banners to promote the Haunted House in Kitchener that we run every October. If you’re looking to make business pop with some cool promotional graphics, giveScutt Signs a call.

The Zombie Truck Fabrication & Build Process : ZOMBIES!!!!!!!!!!
The final element to complete the zombie truck project was the most important element of all, ZOMBIES! However with so many haunted house prop fabrication companies in North America we had to start a search to find who could handle a custom project like this. We wanted zombie props that have never been used in any haunted attractions before, they had to be custom made from the ground up. The team over at Haunted House Creations in Toronto Ontario was up to the challenge and over the course of a few weeks created three amazingly detailed zombie figures, each with their own unique look. A doctor (freshly turned), a businessman and a rock and roller.
If you are looking for any zombies, cool haunted house animatronics or just some really amazing halloween props for your home or pro haunt, make sure you visit the website of Haunted House Creations.


